Consistent deck screw placement and spacing between deck boards comes from a system of jigs and spacers
On decks with exposed fasteners, getting the screws in line really makes a difference in how professional the end result looks.
Just as important is the space between the deck boards. If these lines are not consistent, they will call attention to themselves—and not in a good way.
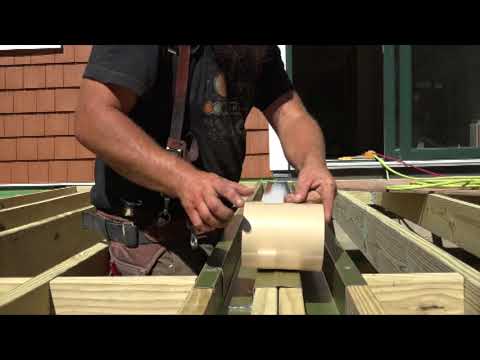
Straight lines of stainless steel screws begins on this job with a multi purpose jig
It establishes equal distance between screws and it also establishes consistent spacing for scarf joints.
A chunk of LVL is the same width as the deck board and about eight inches long. A fence allows it to ride along a joist edge. On another section of deck, the framing is different, and these auxiliary legs from the side are screwed into the front to butt the side of floor joists.
Establish a pattern
The Outermost deck board sets the pattern and layout for this three-sided deck, so Ben establishes screw placement every 16 inches on center over the sleepers. Aligning the reference point with the mark puts the screw right where you want it without any head-scratching.
Along the side section of deck, these fold-down tabs ride along the edge of the I-joist placing the fasteners in the center.
The second set of nail holes is for sections with double joists. Because they was slight variability in spacing and material thickness, the holes are marked in a two-step process.
Consistent spacers make consistent gaps
So that’s Ben’s little red spacer. He gets them from FastCap. They are stackable, magnetic, and nifty.
These red ones give a ⅜ inch gap between the boards.
You may have noticed that this decking is 2x6. That’s because of the wide spacing of the cantilevered joists. Around the corner, where they framed over a concrete roof, the framing is tighter and the decking is 5/4x6.
The two types of decking varied in width, so Ben enlarged the gaps to 7/16 over here. This way, the boards and the gaps are centered.
At first they tried cutting countersinks for the screws, but they got less tearout from the western red cedar by just driving the screws straight into the lumber, so that’s what they did.
These 7/16 inch shims are home made, but Ben was able to find some solar powered shims on Amazon.
Various persuasion methods for deck boards
Regardless of what kind of shim you use. Stick it in the gap, push the deck board against it, and drive the screw. If the board needs more than just the encouragement of your ankle, use a bar clamp.
If you don’t have a long enough bar clamp, break out the old beater wedge.
—Ben Bogie owns Built to Last Design & Build, LLC, in New Milford, CT
