In this episode, we are joined by Jonathan Smegal, M.A. SC a Senior Project Manager with RDH Building Science Laboratories breaking down the nuts, bolts, what, why and how of R-value, insulation, and building assemblies.
What R-Value is:
R-val·ue | r ˈvalyo͞o | noun
"A measure of the resistance of a material to heat flow, therefore the greater the R-value, the better the insulator the material is." —Jonathan Smegal
There’s a formula for it, if you’re interested, it is temperature difference on either side of something divided by heat flux, or basically, its ability to keep the temperatures separate.

where:
- R val (in K⋅m2/W) is the R-value
- ΔT (in Kelvin) is the temperature difference between the warmer surface and colder surface of a barrier,
- Φq (in watts/m2) is the heat flux through the barrier.
The R-value of a material is determined by holding temperatures on both sides of a material, typically 50F and 100F, which has a mean temperature of 75F, and measuring the heat flux that crosses the sample.
This is the standard at which all insulations are tested and recorded.
At least insulation products that are used in the building enclosure.
There are some arguments that this temperature range, 50F - 100F isn’t appropriate to measure R-value, because that’s not typically the temperature range that we need a lot of insulation.
It is like choosing insulation products to work best where we least need them: mild climate zones. It’s not really a dirty little secret of R-value, but it’s not not-one either.
Let’s back up a little bit to where R value came from.
The R-Value was proposed in 1945 by Everett Schuman at Penn State University as a way to easily compare insulation performance.
Before that, scientists used u-factor— a measure of thermal transmittance—and K-value, a measure of thermal conductivity. Both U-factor and K-values yield very small numbers, and smaller is better.
For example, EPS foam has a k value of like .033 and wood studs have a k-value of like .5 or so.
Everyone knows that small numbers are boring, so someone in a marketing department somewhere decided to flip the equation.
The inverse of small numbers are big numbers, and flipping the equation makes the curve into a straight line on the graph, which is easier to read.
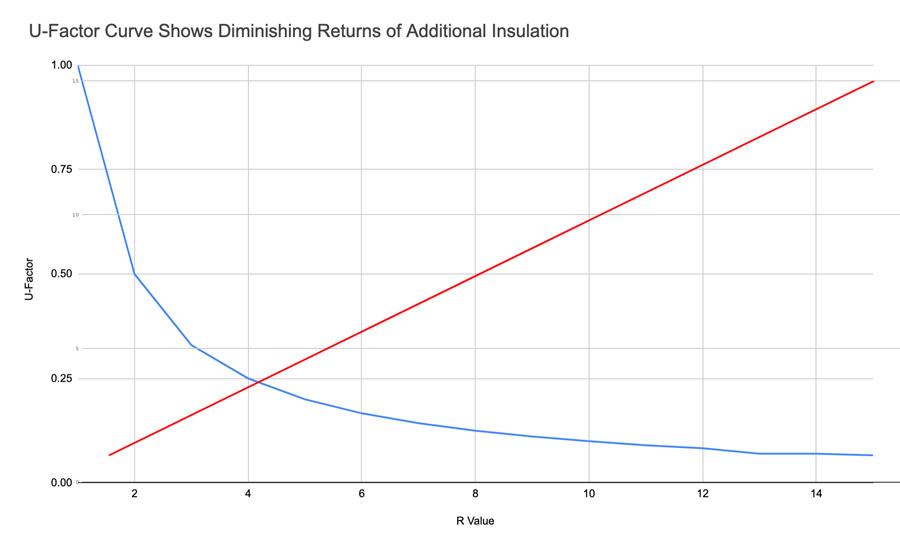
So that’s what stuck.
In Canada and the US, U-factor often refers to an assembly—usually windows—and R-value refers to a material, like fiberglass or spray foam.
In Europe, they pretty much use U-factor for everything.
How R-Value works
Also, it’s important to keep in mind that the R-value of most materials actually changes at different ranges.
This is the main reason that we’ve been doing our R-value testing in our lab over four or five different mean temperatures from cold all the way to hot for many years.
Incidentally, the way they test windows is to put a bunch of tennis balls on top of cans of cold beer on one side of a wall with a window in it. On the other side, Black labs pant at the window as they look at the tennis balls. They measure how long the beer stays cold.
There’s no word on whether they drink the beer and throw tennis balls for the dogs after the test is over, but it seems likely.
Most materials have slightly higher R-values at cold temperatures and slightly lower R-values at hotter temperatures.
And then there are some materials that have a maximum R-value right at the test requirement of the mean temperature of 75F, but the R-value decreases both when its warmer and colder than 75F.
Another dirty little secret, perhaps, but one that probably misses the bigger point about R-value: that walls, roofs, and floors are not made with one material.
In fact, they are assemblies of many materials squashed together by people working in the mud, snow, sun, and rain.
A wall assembly has many components that pass through the insulation, called thermal bridges, that reduce the overall effectiveness of the insulation.
So the number on the insulation package only refers to the actual insulation, installed perfectly at the optimal temperature range, in a lab. The R-value of a wall is much different than the big number on the bag.
Historically, people would put an R-19 batt into their wood stud wall and then report that they have an R-19 wall assembly.
But when the air gaps around the perimeter of the insulation are added to the thermal bridges created by studs and the insulating properties of other layers of an assembly, the number is a lot different.
That’s why The RDH Building Science Laboratory team suggests using the term ‘Effective R-Values’ of wall assemblies.
‘Effective R-Values’ of wall assemblies, for example. If you were to put an R-19 batt into a wood stud wall with studs approximately 16-inches on center, you are reduced to a best-case scenario of an effective R-value of R-13.
So, reduction of R-6 just by putting it into the wood stud wall.
And that doesn’t even take into account areas of increased framing, or the R-values of windows, doors, or areas of air leakage, which will all decrease the overall effective R-value even further.
There is a lot more to a club sandwich than sliced turkey. Many layers make that sandwich taste different than a slice of turkey.
Likewise, when you put insulation into a wall it acts differently than either an empty wall or a pile of insulation behaves.
It behaves like an assembly of materials attached to each other. Done well, the assembly will provide structure, water control, air control, and heat control. Often, though they do not.
And it’s not just because of knuckle-dragging contractors.
Why effective R- value matters
Recently we were reviewing an enclosure design for a building that will be constructed in a very cold climate, think the coldest parts of climate zone 8.
We were told they had an R-50 wall assembly, which is appropriate for that climate zone.
When we looked at the enclosure plans, we saw that they planned to put R-51 of spray foam into a very wide steel stud wall cavity.
Based on the gauge of the framing and the spacing of the steel for structural requirements, this R-51 actually became approximately R-12 effective.
Before the installers even had a chance to screw it up, the R-value had plummeted from R-51 to R-12. That’s a 75% drop if everything is installed perfectly.
This difference is going to be a problem in the severe climate where it is being constructed.
In this severe climate, they chose thicker wall studs to overcome heat loss, but they were barking up the wrong thermal tree.
A lot of people try to fix thermal bridging by making the cavity bigger and adding more insulation. But in fact, you just lose a larger percentage of your R-value every time you do that.
In this case, they were using steel studs, which have an R-value of something like negative infinity, so it almost doesn’t matter how deep the walls are, heat has an autobahn highway every sixteen inches.
We had to change the design to have a significant portion of the R-value installed as continuous exterior insulation—outside the main structure.
How to do effective R-value right
Wrapping the framing with insulation instead of relying on insulation between the studs stops almost all thermal bridges, and is relatively easy to install well.
That being said, even continuous insulation can get screwed up.
For example, if you run continuous horizontal or vertical z girts on the outside of your structure through the insulation to support the cladding, you lose somewhere between 50% and 80% of your insulation R-value as a result.
In residential construction, you’re not as likely to see clips—unless architects are involved—but more commonly, you’ll see wood strapping installed over the exterior insulation and attached through the insulation with long screws back to the structure.
The cladding is attached directly to the wood strapping. This works really well for a wide range of claddings, except for some of the heaviest claddings that may require additional support.
The only thermal bridges are the screws that penetrate the framing every couple of feet.
Yes, the screws are part of the assembly, and they count as thermal bridges, but they are teeny bridges, so they are usually an acceptable tradeoff.
If you want to determine the R-value of a large full-scale test wall...
Like in a big laboratory with a big hot box
You’re going to want to look at ASTM C1363
Which is a test method for figuring out the R-value of a very large building assembly. It is literally titled
Standard Test Method for Thermal Performance of Building Materials and Envelope Assemblies by Means of a Hot Box Apparatus
Did somebody say giant hot box?
About 12 years ago, we started building a very large climate chamber in our laboratory to measure the R-value of full-scale wall assemblies.
In our climate chamber, we can measure wall assemblies 12-feet wide and 8-feet high and get the effective R-value, taking into account all components of the wall system as well as the losses as a result of air leakage and pressurization.
The climate side of the thermal metric box can vary between -30C and 60C
For those of you keeping score, that’s between -22 and 140F on the climate side
And we keep the room side at around 22C
About 72F
We can pressurize the wall assemblies to determine the effective R-value as a result of air leakage.
In fact, they have pressurized and tested many types of wall assemblies
We’ve tested many types of wall assemblies, including wood frame, steel frame, many types of insulation…
And it always seems to come back to a simple truth:
No matter what insulation you use, whether it be fiberglass, XPS, EPS, polyiso, spray foam, it must be installed properly to get the maximum R-value you can out of the insulation material.
Putting the R in insulation is what ProTradeTrade is all about.
Remember, you get paid for what you do and what you know. If you don’t know what you’re doing, it doesn’t matter how well you do it, right?
Think about that one while I thank Jonathan Smegal and RDH Building Science Laboratories for being such willing participants in our show.
—7 Minutes of BS is a production of the SGC Horizon Media Network.
